How To Integrate PayPal with Your Website
11 MIN READ
|
Updated on March 13, 2023

Whether this is your first eCommerce store or 20th, PayPal is an excellent payment processing choice primarily for its agility and simplicity. A PayPal integration does not require advanced technical knowledge or a complex tech stack, has a quick time-to-value, and due to its widespread adoption is a popular choice for most businesses.
If you are planning to add (or start with) PayPal as a payment gateway to your website, you’ve come to the right place. In this article, we will share the different ways to connect with PayPal and start collecting payment.
PayPal supports 200 countries/regions and 25 different currencies, making it a truly global choice. It’s consumer-market popularity stokes demand and has enabled it to also offer three different integration options to businesses with different sizes, target audience, and workflows:
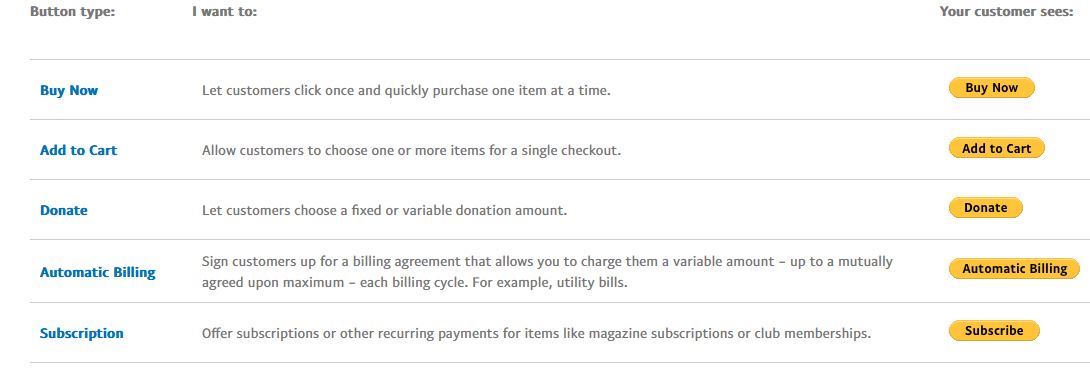
If you’re only selling a few products on your website, a simple PayPal checkout button is the fastest and simplest way for you to meet your needs. The – ‘Wired’ magazine (for example), added the PayPal button to their website so customers could easily sign up for a subscription in just a couple clicks. In this case, PayPal will automatically set up a yearly automatic renewal and collect payments for the company on a recurring basis.
This does away with the hassle of setting up a shopping cart and all of the other bells and whistles when setting up payments for your customers. All you need is a PayPal account and a button that says “Buy Now,” or “Subscribe.”
This is limited to a hosted PayPal checkout option, which means – when someone clicks on the button, they will be taken to PayPal’s website, can enter their payment information, and complete the transaction. Once the payment is processed, you will receive an email notification, and the customer will receive an email receipt. It’s really that simple.
Related Read: 7 eCommerce Checkout Page Best Practices with Examples
This method is perfect for simple checkout use-cases. For businesses starting a subscription box service with only one core recurring product, customer experience is multiplied by enhancing accessibility and simplicity. Hence complex checkout is unnecessary.
Adding a PayPal button to your website means customers can checkout quickly and pay using their PayPal account. PayPal has different buttons for different purposes including:
There are no setup costs with this process and it only takes a few minutes to start accepting payments.
One of the downsides is that you’ll need to create a new button for each individual item, rather than being able to use the same button for multiple purposes. Another potential issue is that PayPal tends to side with the buyer in disputes over digital goods, leaving you at a disadvantage if there’s an issue with a purchase.
PayPal already works with most eCommerce providers online, including WooCommerce, Shopify, and Wix. Integrating with PayPal Payments Standard lets PayPal handle the full payment-processing solution for your business. Integration is simple, and doesn’t require developer expertise.
All you need is a ‘PayPal Business’ account and a few minutes, and you can start collecting payments instantaneously.
Here are the four steps involved with setting up PayPal Payments Standard:
While the exact process varies between platforms, integrating PayPal Payments Standard with any eCommerce platform follows the aforementioned umbrella outline. To make things easier, we’ve outlined the exact process for many of the most popular websites below, including – WordPress, Wix, and Squarespace. Read on to find out.
PayPal’s API integration is preferable when a business has an interconnected tech stack and access to a developer. Using the API allows you to create and manage a large number of PayPal Payments Standard buttons using their Javascript SDK. Adding the code to your website enables you to start collecting payments immediately. Additionally, the API can be set up to automatically fulfill orders and store transactions in a designated database giving you more control over how your checkout works.
The API integration also provides access to more data and analytics, allowing you to track your users’ behavior and transactions. Ultimately, this can help you improve your application and make it more user-friendly.
This is an advanced method and, in most cases, is only helpful for developers who provide shopping carts to merchants.
Here are the steps involved with API Integration:
PayPal is one of the biggest payment providers available, with over 400 million active users worldwide. Seamless integration with many popular storefronts is one of the defining features of PayPal Payments Standard, which allows customers to make purchases with just a few clicks. Let’s take a look at how to get PayPal integrated with the following eCommerce platforms.
There are additional steps required if you want to set up recurring payments:
PayPal connects with most solutions, so if your preferred partner isn’t listed here, head to its help section or reach out to customer support to find out the exact process of adding PayPal as a payment processor.
There’s a reason PayPal is one of the most popular payment gateway on the internet — it works well with the rest of your tech stack. Business owners can use PayPal to integrate with different software, making it even easier to use.
Here are some examples of how PayPal can be integrated into your business.
Any business that relies on PayPal for payments knows how important it is to have a seamless integration between their enterprise resource planning (ERP) software and PayPal. Without integration, data would need to be manually inputted multiple times, which creates the potential for errors and makes the process much more time-consuming.
Integration helps to ensure that information is accurate and up-to-date and that processes are much more efficient. Automating the processes of data entry and reconciliation of payments can free up staff to work on more important business, and in the case of smaller businesses, it can reduce the need to hire staff to do this work manually.
While PayPal can be set up to collect recurring payments through subscriptions, an integration with subscription management paltforms like Chargebee unlocks subscription superpowers for businesses.
Think – automateed invoicing, revenue recovery, smart dunning and reportage, and a plethora of additional features to make subscriptions a breeze.
Chargebee is a flexible tool that can integrate with all your favorite tools, including your customer relationship management (CRM) software, accounting software, and finance platforms, so you can get a complete overview from a single dashboard.
Access to self-service portals that give your subscribers freedom of choice is another key benefit of Chargebee’s integration with PayPal.
If you’re using accounting software to manage your finances, you’ll want to ensure that your sales data is automatically synced and sorted. Integrating PayPal with your accounting software is the best way to do this.
When you integrate PayPal with your accounting software, all of your sales data will be automatically synced and sorted. You won’t have to manually enter any sales data into your accounting software. And it also means that you won’t have to worry about losing any sales data.
PayPal is great for businesses of any size. Its very presence on your checkout helps boost the trust in your brand and leads to more sales.
If your business is in the market for a more flexible and powerful recurring payment management solution, Chargebee is the ideal choice. With its quick and simple integration with PayPal and other top tools, Chargebee gives businesses of all sizes access to advanced features that make managing payments easier than ever before.
PayPal handles all the credit card processing for you and takes a small percentage of each sale as a service fee. Customers can also pay with their PayPal digital wallet, use its ‘buy now pay later’ feature, or with PayPal credit services with any transaction.
It’s a very user-friendly system that makes it easy for customers to make purchases on your website. PayPal can be used as a one-touch checkout option to set up recurring subscriptions, which means customers don’t need to go through the hassle of adding their billing information with each new order they make.
There are three ways to integrate PayPal with your website: