Modern technology makes it possible to have an entire call center run through the internet, which makes setting up a virtual call center easier than ever before. And on a smaller scale, an inbound call center isn’t really different from a standard phone system. It only requires a handful of steps that take less than an hour at most.
Don’t worry about trying to make everything perfect on day one. Just focus on launching right now, and you can tweak the minor details later through trial and error—learning along the way.
Step 1: Come Up with a Plan (10 Minutes)
Spend a few minutes narrowing your focus on how you want your call center to operate. This doesn’t need to be a formal business plan or anything too fancy. A simple, hand-written outline with a few bullet points is sufficient for this step.
- Are you setting up an inbound or outbound call center? Both?
- Will your call center agents just work the phones? Or will you provide omnichannel support?
- How many call center reps will be on your team? Do you need to hire down the road, or can you handle everything with your existing resources?
- Will your call center grow as your business scales?
- Does your team need physical desktop phones? Or will softphones (computers and mobile devices) be sufficient?
- What are your goals? Are you trying to boost sales or provide better customer support?
Don’t spend a ton of time here—just enough to have a clear vision. The clearer the picture, the easier it will be for you to find the resources you’re looking for.
Just make sure you know what you need, and then move on.
Step 2: Choose a Center Platform (5 Minutes)
We’ll make this step easy for you. Go with Nextiva.
While there are plenty of other high-quality call center solutions on the market, Nextiva is the best choice for just about anyone—small businesses, large organizations, and everything in between.
Nextiva’s scalability is what truly makes it great. You can start small without breaking the bank and then grow as your needs change over time without having to switch providers.
Most brand new inbound call centers can get away with one of Nextiva’s basic phone system plans. You’re getting a complete business communication suite that can easily be deployed from anywhere—so virtual call center reps can be onboarded and start answering calls almost immediately.

If you need additional features, like a multi-level auto attendant or call recording, it’s just a matter of upgrading to the next tier. But if you have a large-scale call center with hundreds of employees, Nextiva also has dedicated contact center solutions to accommodate your needs.
Sign up for Nextiva today. It’s the easiest and most cost-effective way to set up a virtual call center of any size.
Step 3: Configure Basic Settings (30 Minutes)
There are literally dozens of potential settings and customization options you can set up with your virtual phone system. But don’t worry about that stuff just yet. Most of those advanced settings aren’t needed right now.
You just need to configure some basic settings that allow you to start making and receiving calls. If this is taking you more than 30 minutes, you’re probably doing too much.
Phone Number
The first thing you’ll need to do is select your virtual phone number. You have a few different options to consider.
- Local phone numbers (with an area code in a specific region)
- Toll-free numbers (800, 888, 877, etc.)
- Port your existing phone number
You can also mix and match any combination of these. Every Nextiva plan comes with a free local and toll-free number. If you want to keep your current number, porting it to Nextiva is free.
Adding new numbers or assigning extensions can easily be configured from your Nextiva admin dashboard. But most inbound call centers don’t need to worry about that stuff right now.
Voicemail and Greetings
Next, enable your voicemail and set your greeting. So when someone calls your business, you’re in full control over things like:
- How many rings before they’re sent to voicemail
- What greeting gets played if nobody answers
- Greetings if the line is busy
- After hours messages
For now, stick with just one basic greeting for all inbound calls—with the option for people to leave a message if nobody answers.

Simply click the Voicemail button from your admin dashboard, toggle the switch to On in the top right corner, and then click the red Record button to set a custom voicemail greeting.
Call Forwarding
Nextiva gives you total control over where inbound calls can be routed. You can define if incoming calls need to be routed to a specific number based on the day, time, or specific circumstance.
These options can be applied to all users, call centers, call groups, and even auto attendants.
For example, let’s say you’re a small business owner with just one or two remote call center reps fielding inbound calls throughout the day. You can set up a call forwarding option so that if both reps are on the other line or unavailable, any incoming call gets forwarded directly to your phone (or someone else’s phone within the company).
From your Nextiva admin dashboard, go to Users > Actions > Voice Settings > Forwarding.

From there, it’s just a matter of turning On or Off any of the call forwarding options and then adding a number for where the call should be forwarded in those particular circumstances.
Basic Call Routing
You can configure your call routing settings to customize the path of every new inbound call.
For example, let’s say someone calls during normal business hours. You can let the caller press 1 for sales, press 2 for support, or press 3 for billing. All of this can be set up in a visual call flow builder.
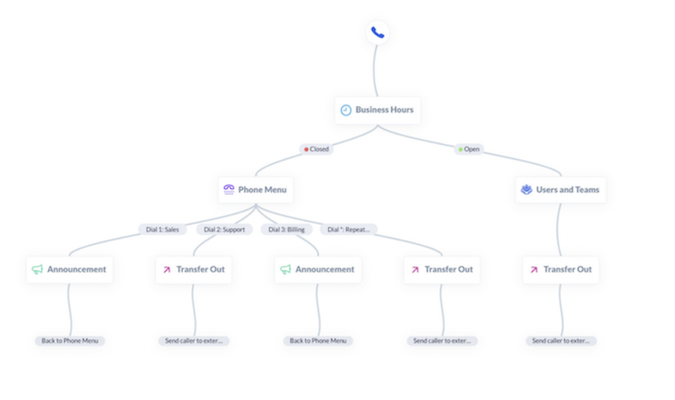
Navigate to Communications from your admin dashboard. Then click Phone Systems and select Call Flows.
Don’t spend a ton of time here. You can really get lost in the weeds if you try to do too much. For now, just set up a simple flow for where calls are routed during business hours and the path they take after hours or on weekends.
Nextiva also has an IVR (interactive voice response) tool that allows your inbound callers to navigate options using voice commands instead of their dialpad.
Again, this can get pretty advanced—so don’t worry about doing anything too fancy right now. Instead, you can just set up a basic IVR that somewhat mirrors your basic call flow.
Step 4: Run a Test or Two (10 Minutes)
Once you’ve configured your settings, you just need to double-check that everything is working as you intended.
- Call your new number
- Navigate all the menu options in your phone tree
- Leave a voicemail (and then listen to that voicemail)
- Call while the line is busy and see if the call gets forwarded appropriately
- Test the call quality to ensure there’s no phone echoing or dropped calls
You get the idea. Basically, anything you’ve configured in the previous steps should be tested to ensure it’s working before you officially launch the call center and start accepting inbound calls.
Fix any issues, then you’re good to go.
Everything else is ongoing work that can be configured over time.
Step 5: Improve Your Virtual Call Center Over Time (Ongoing)
The first four steps are all it takes to get your virtual call center up and running. But there’s always room for enhancements, minor adjustments, and growth. Here’s where most people start:
Staffing
You’ll eventually reach a point where you need to hire more people to run your virtual call center. The key here is finding the right balance between an acceptable hold time and expanding too quickly (paying people to sit around doing nothing). Hiring is expensive, so it’s definitely best to err on the side of caution—and only expand your team when you’ve truly maxed out your current resources.
Employee Training
First, you obviously need to train your staff to ensure they know how to use all the call center features at their disposal. That’s a given. But you should also make time to listen in on live calls and review recordings while closely monitoring call center KPIs and other important call center metrics. Use this information to identify areas for improvements and train your staff on how to handle certain situations better.
Advanced Call Center Features
Your initial setup only focused on the basics to get up and running. But eventually, you should dive deeper into advanced call center features, like:
- Automatic call distribution (ACD)
- Advanced queue management
- CRM integrations
- Live coaching
- Predictive and progressive dialers (for outbound calls)
- Advanced automation rules
- Further advancing your call flows
- Using IVR for payments
Rather than trying to implement all of this stuff at once, it’s easier to experiment with these features on an as-needed basis.
Leveraging AI
Nextiva has tons of great AI features that really make life easier for your call center reps. You can leverage AI for things like auto-transcriptions over manual note-taking, AI-created call summaries, sentiment analysis, intelligent call routing, and real-time agent assistance. AI can also be used for customer-facing use cases for self-help—where questions can be answered without even talking to a live agent.
Omnichannel Support
You may ultimately transition from a call center to a contact center and let your existing reps handle customer support through additional channels beyond voice calls. Live chat, social media, email, video chat, and ticketing support are all logical ways to expand your customer service methods.
Upgrading Your Plan
Unlocking new features and capabilities is just a matter of upgrading to the next plan tier. For smaller businesses and startups, you can go years without needing a complete call center solution and just use Nextiva’s basic VoIP phone system to manage inbound calls. If you outgrow a plan, simply upgrade to the next one, and you can eventually upgrade to a call center solution when you’re ready. That’s one of the many reasons why we recommend Nextiva.
What Types of Businesses Need a Virtual Call Center?
When we hear the term “call center” we automatically assume it’s a big company. But there are plenty of use cases and examples of businesses that can benefit from a small one-person call center.
- Ecommerce stores
- Property managers
- Plumbers, electricians, and HVACs
- IT support
- Nonprofits
- General contractors
- Landscaping services
- Freelance professionals
- Salons and barbershops
- Car dealerships and repair shops
- Restaurants and catering services
While the exact type of inquiry varies by industry, all of these types of businesses have customers who need help with something. Whether it’s scheduling an appointment or requesting a quote, your business can always be reachable by phone—and you won’t need an entire team to accomplish this. You can do this on your own or just set up one or two virtual call center reps to manage this stuff on your behalf.
Why Starting a Virtual Call Center is Worth It
If you’re running a small business and feel like it’s too early to start a call center, think again.
You can launch a virtual call center for less than $30 or $50 per month without having to invest in any new equipment or infrastructure. With VoIP tools like Nextiva, your call center can be run from any location with internet access—and agents can use their existing smartphones or computers to field calls. That’s it.
For such a small investment, this ensures that you’re always reachable by phone. It keeps your customers happy and coming back for more.
No more missed appointments or missed sales opportunities. This also makes your business appear larger and more professional than you actually are. Even if you’re running a one-person operation, you can still set up a virtual call center and unlock the same benefits of bigger players in your industry.
With a traditional call center, you need to pay for rent, desks, utilities, hardware, and hire enough people to make your investment worth it. But with a virtual call center, you and your remote staff can field calls from the comfort of their own homes.
Virtual call centers also aren’t bound by geographic constraints. By having agents spread out across different time zones, it makes it easier to run a 24/7 call center or at least maximize the hours in a day for your call campaigns and availability.
You can save on overhead costs while still securing top-level talent—and most importantly, providing better customer service will ultimately benefit your bottom line.
Virtual Call Centers Are Easier (and Cheaper) Than You Think
It may seem like we’ve left a lot of steps out of this guide. But we intentionally cut this down to focus on what truly needs to get done to set up a virtual call center.
Everything else you can ignore. Those are just extra steps that overcomplicate things. Use our quick steps to launch in less than an hour, and you can always make adjustments down the road.
Most businesses don’t need actual call center software at this early stage. You’ll be fine with one of Nextiva’s business phone plans, which start at just $23.95 per month for teams of four or fewer. As your team grows, the cost per user drops—and you can always upgrade to a higher plan tier to unlock new features.
Sign up today to get started with Nextiva and launch your virtual call center in less than an hour.